Design

Cameras are not Eyes: How to Buy Gems Online

Cameras are not Eyes: How to Buy Gems Online

As a fully online seller, you can imagine how often I am asked for more photos and videos of my gems, not even including layouts for custom orders. And given that I try to have 5-7 listings up a week even when it’s slow, that means an awful lot of photography.

And, dare I say it, probably 90% of the extra photos I take for clients are superfluous. They simply do not convey sufficient additional information! In fact, they often tell you less, not more, and they can be misleading. Let’s look at why.

Cameras are evil little liars, and they need a lot of prodding to tell you what something really looks like. Each camera has its own way of telling lies, and in order to reverse engineer the facts about what a gem actually looks like, you first need to know about the camera and the light, not about the gem.

For instance, for video I use my Samsung S22 phone, usually on the macro lens. I photograph in the daytime, outdoors only, on a white plastic board. A lightly overcast day is best, though sunshine is good too as long as I stay in the shade (and the shade cannot be artificially created by my blue umbrella or a tree that lets in light as both will add their own color to the gem). Just like a Sri Lankan seller, I prefer the later afternoon for photos, though morning works also. In summer, midday light is too strong and too cool. I want slightly warm outdoor light, very lightly filtered, even if I just use my own body to get away from the sun. No shots should ever be taken in direct sunlight as that will make the colors way too bright in the photo (yes, brighter than the gem actually is).

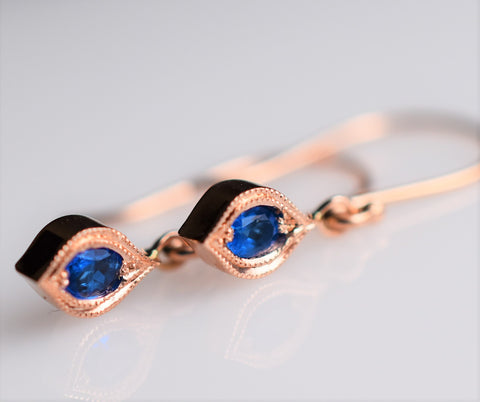
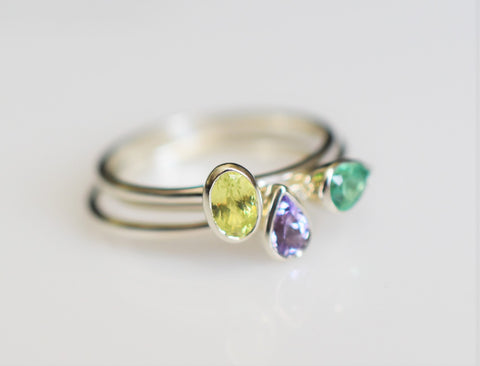
We were very pleased with the video for this sapphire pair (here on Etsy): 

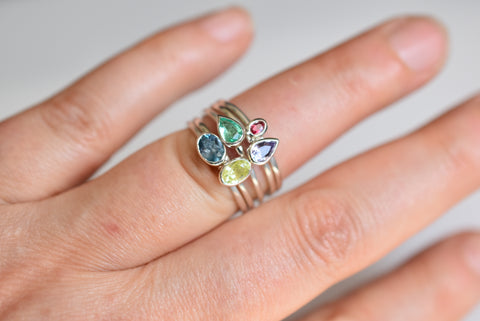
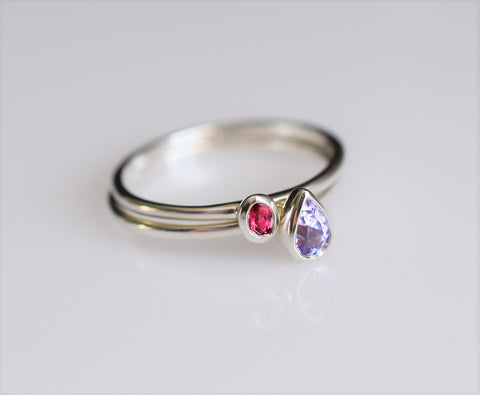
The video for this ring also came out very well (here on Etsy)

And, last but not least, my longitude is 40 and that’s important when my photos are interpreted. Both the longitude, season and time of day will change the color temperature, and that can especially affect the photos of green gems, which is the hardest color to photograph in my view. As a vendor from Tucson once remarked: I know why you New Yorkers like Vietnamese lavender spinel, it looks amazing in your light. When we take photos in Bangkok the gems don’t look nearly as good (by the way, sapphires often look super great in Madagascar and dark and sooty in NJ).

I have a friend who sells gems out of Albuquerque, NM. She uses an iPhone and her longitude is 35. Her videos are often more saturated than mine but because her iPhone is older, the colors in the video are less enhanced. When we compared shots we both took in Tucson of the same gem (in the same place), we didn’t get the same colors.

When you take photos of gems indoors, things get worse, not better. I get asked to take them often, usually under the umbrella of ‘different lighting conditions’ – I assume that means different artificial lights as the natural light ones are in the listing.

Tanzanites with different cameras and different lighting conditions.

Have you ever taken indoor photos of gems and got an accurate result? If you haven’t, let’s try together now.

Get a hold of a gem you want to photograph, take out your phone and turn on the camera. Pick an indoor light (led, fluorescent, daylight bulb, whichever) and hold the gem under it. Hold the gem between the fingers of your non-dominant hand, using the back of your hand and two fingers as a ‘tray’. Now hold the camera over it and take a good look (no need to take a photo). Then look at the gem without the camera. Try this with as many different light sources as you like. What do you see? Is it the same with your eye vs the camera?

I am 95% certain that in most cases you will not see what your eye sees – and in many cases, the difference is actually drastic. The colors take on different hues.  And therein lies the problem. Your camera adjusts itself so it can take a photo under those conditions, and even a top of the line camera will do that, unless it has a fully manual mode (in which case it is still hard to get an accurate photo).

Of course, we do use editing software to remedy this, and we do our best to make the gem look like itself. Like most gem dealers we have taken and edited tens of thousands of photos. For a quick editing trick on color I use the color of my hands in the hand shot to edit, or just the background. I take and edit about 200-300 photos each week, and I prefer to take fewer rather than more, especially if they are unnecessary or misleading. A professional photographer will not edit this many photos for publication.

Finally, what about using a lightbox? There are some very expensive (1K) lightboxes out there that are phenomenal. Even with greens they do a reasonably good job. But they do not beat outdoor photography in the right lighting conditions. If you try to photograph emeralds, which, for reasons I do not understand, are the most difficult gemstones to photograph accurately, you will see how good the light box really is.

Takeaway: I realize that when you buy gems online, you have no choice but to go by photos. But don’t ask for indoor shots unless you want to see a specific color change. In that case you want to see an incandescent light photo and an outdoor photo. When I do them, I provide all three, indoor color change between two indoor lights, and outdoor. But I don’t think that the indoor photos will be the same as what the person sees when they open the box containing their gems.

Color change garnet color change

This color change garnet is on Etsy here.

What to ask for instead are outdoor shots, hand shots and against a white background. Shade. And you want to know where the photos are taken because you need to subtract intensity and add in grey or vice versa. You do want to see a video in addition to the photo, preferably on a hand so you can check for window while the gem moves. You want one photo from the side and one from the back. Lightboxes would be a possible alternative if it is a good one. It needs to be exceptionally bright, and the light temperature has to be exact.  

Continue reading

The Magic of Highly-Skilled Gem Setters

The Magic of Highly-Skilled Gem Setters

‘Prong pusher’ is a rather derogatory term and not entirely fair, as 99% of jewelry sold on the mass market these days is prefabricated to simplify labor and save time and money that way. Simple prong setting is both fast and fairly easy. It also doesn’t require a lot of tools.

For this reason, mass produced jewelry is more affordable. And we all want to save money! Or do we?

Well, that depends on what kind of look you want in the end, as real hand setting also looks much more richly-detailed and special. In this blog, we want to show you how genuine “hand setting” works so you can understand and see why it looks different. And, yes, there it is: why it costs more. Good setters are in demand, they are always busy, and they earn good money. The best of them turn down work from anyone they don’t know or haven’t been introduced to by someone they know.

Before we get down to the nitty gritty details, let me get a misconception out of the way. All (or almost all) setting is done by hand in some shape or form. The only exception is when ‘casting gems in place’ where the gemstone is cast together with the jewelry piece. But this only works for diamonds and certain synthetic stones as natural gemstones will just get fried by the heat of casting. Also, it still involves some type of setting, in this instance, the setting is done in the wax.

In this blog I want to focus just on prong and pave setting, not bezel setting, rub over, snap setting, or any other type.

Simple Prong Setting

Prong setting literally involves only pushing the prongs over the stone. But nothing is basic. Generally, prongs must be clipped down and refiled, and with most settings, grooves have to be cut into the prongs where the gemstone will sit. That’s called “cutting the seat.” You will need a jeweler’s lens, a handheld drill, the right drill bits, bench and bench pin. Click here for an article on the tools that make up a jeweler’s work bench.

Pre-Set Pave Setting

In the pavé setting alternative, the prongs are actually little balls of metal, called “beads.” Beads are short and stubby. These beads are added in the CAD, together with guideholes that tell the setter where the gems will go. Sometimes these guideholes have to be opened up a little bit more by the setter. Millgrain can be added in the CAD also, as well as any kind of engraving.  The setter places the gem into the seat and gently pushes the beads over the gem, or down from the top.


CAD Ring Design Featuring Short Prongs and Half-Round Band
Original CAD Design Featuring Half-Round Band and Short Prongs


Ring CAD Design Featuring Millgrain and Short Prongs
Modified Band with Millgrain Added


14KYG Ring with Opal and Gemstones
Finished Ring in 14KYG Featuring an Australian Opal, Emeralds and Two Paraiba Rounds


We did it this way because you cannot millgrain a half round shank, and we were setting cabochons which don’t have a girdle.

Hand Setting, Prong

For simple prong setting, the process is very much the same as above, except that the prongs are always cut and then filed into claws (unless the prongs are shared because no claw can point in two directions at once). The setter cuts the seat as well. But the added experience of the hand setter can still show that their work is a cut above, because the height of the gem in the setting will be just right, the prongs not crooked and the claws very small.


Ball Prong Ring
Ball Prong Set Ring


Claw Prong Earrings
Claw Prong Set Earrings


Hand Cut Pave

Now here’s where hand setting really makes a difference! For hand setting, you will not find either millgrain or beads in the model. You will get guideholes because in the CAD software you can easily place those perfectly evenly. This comes in handy when you are making an eternity band with alternating colors so you need an even and perhaps exact number of gems. When we do our eternity bands, we do not have guideholes. We start with a simple wedding band. The setter then scoops out the prongs, drills the holes, one at a time. He can even split the prongs down for what is called a ‘fishtail pave’.


Pre-Fabricated Prongs
For Comparison, Here is What Pre-Fabricated (Created in CAD) Prongs Look Like...


...vs. What One of Our Settings Looks Like, Pre-Gem Setting


For uneven gems like most colored stones, hand setting can be very helpful, as the setter can ‘even out’ a slightly wonky gem by how he drills the hole and places the bead. They can also put more beads in between stones if the stones are smaller than expected. They can add a pattern with beads. And for the millgrain, as well as for the overall more elegant facing up of “bright metal”, they will cut the metal around the stone at an angle, literally called the “bright cut”.


Nine Stone Ring Featuring Millgrain and Bright Cut Settings
Our Nine Stone Ring is a Great Example of Hand Set Millgrain and Bright Cut Settings


Kite Dangles
Gorgeous, Upward-Facing Bright Cut Featured on Our Kite Earrings, Set by Michael


Elizabeth Earrings
Our Elizabeth Earrings, Richly Detailed with Hand Applied Beaded Settings and Double Millgrain, Set by Ethan


 Aside from considerable expertise as well as time spent on hand pave setting – figure on about triple the time, if not more – you also need to own a microscope. A jeweler’s lens will not have enough magnification or enough light. These microscopes cost upward of $3000.

But really, words cannot capture it. You have to see it for yourself. Here is a video our setter, Pierre Berberoglu, produced which follows him through the entire magical process of setting gems by hand. This video was made with the aid of a special camera. Note that the video is condensed and sped up. The work actually took 45 minutes (and he is a very fast setter - another person might work on this for an afternoon). With a pre-set piece, this time can be slashed down to one third or less.


And voila! Here is the finished piece:

Our Lily Pendant in 14KWG, Featuring Gahnite Spinel, Purple Sapphires and Paraiba Tourmalines


Continue reading

A Cut Above: The Decision Making Behind Colored Gemstone Shapes

A Cut Above: The Decision Making Behind Colored Gemstone Shapes

It’s schizophrenic really, and it’s true of 90% of colored gems; they don’t fit into prefabricated settings, so you end up having to get settings made from scratch, which adds to the cost. Back when I first started on Etsy, it was difficult to communicate this to buyers. Foreign Etsy sellers would sell the gems loose and clients wanted me to set them to save money, not because they wanted to spend more, and this was one of the reasons we stopped setting customers’ stones.

Most of my clients now buy gems because they want to own rare collectors’ gems, and so the problem persists to this day. I learned early on that if we wanted to work with colored stones, we had to make our own settings, and my line partially evolved out of that necessity.

But, you might ask, why can’t the gems just be cut to fit? The answer has two parts, one part has to do with the settings and the market in general, the other has to do with the special nature of colored gems.

Let’s start with the settings. Commercial settings such as those from Stuller are made for diamonds because diamonds dominate 95% of the jewelry market. Synthetics are next, and only after that, colored stones. According to one of my setters, Stuller alloys are also very hard because it yields a better pre polish. This works well for diamonds but is not good for the softer colored gems. But more importantly, the prongs are often too short so they cannot fold over the stone. Finally, diamonds are calibrated and can be supplied in any size. Especially small ones. That is not the case with colored stones with the exception of amethyst, citrine, topaz and a few others.

The rest of the colored gems are cut with a different objective. They are cut to optimize the rough. This means two things: they are cut to get the most amount of gem out of the rough stone (especially the expensive ones!) and to bring out the most beauty.

For example: Ceylon sapphires are often step cut with the color emanating from the culet so that you can only see zoning from the back and not the front. But that means they often have a heavy “belly.”  Portuguese cuts are deeper also, and for many lighter colored gems such as mint garnet, this cut brings out the color and adds brilliance.


The pavilion and culet of a step cut Sapphire


Radiant cut sapphire with color in the culet


Emerald cuts and long pear shapes are often used for tourmalines because the rough has a long crystal structure. This is true of emeralds also. Emerald rough from Chivor, Colombia, for instance, is often thin and long. The darker emeralds from Muzo, by contrast, are sometimes cut flatter because otherwise they will be too dark.

Last but not least, Brett Kosnar’s “flower” style cuts are a great solution for flat rough like some lndicolite tourmaline and Mozambique Paraiba.


It’s fair to say therefore, that the cutter has a different objective than the jeweler. In addition to the above, she or he is avoiding zoning and window, cutting around inclusions, while at the same time considering cleavage, axis, and the overall softness of the stone. High end gemstone rough such as emerald and paraiba are often preformed by an experienced pre former for that reason – this involves cutting the basic shape of the gem to provide the cutter with a guide as to how to showcase the material in the best way. How the gem will be set is not particularly relevant in that process.


 Pre-former, cutting emeralds


So, as designers of colored gem jewelry we have to get inventive and, in my view, it is up to us to close the gap by being imaginative and by designing around the gem. Longer prongs are a definite but that’s not enough. Prong placement matters too when corners have to be protected (a lot of our designs involve double prongs, or special beads placed to help the setters). We must also consider the kind of metal we want to use – white gold can be an unwise choice for Paraiba, for example as it’s a very hard metal and Paraiba is a very soft stone, as well as considering what colors we think will highlight the gems most successfully.

Here are some pretty examples:


 Cushion Cut, Untreated Peach-colored Imperial Topaz, 9.22 x 4.26mm .93 cts


Kite Cut Aquamarine from Madagascar, 8.35 x 6.72mm


Continue reading

The Third C - Using Color in Design

The Third C - Using Color in Design

Finally, let’s get back to talking about color. In this final entry in our discussion about color and gemstones, I want to focus on how I like to use color in design.

First, a little background. When I first started making jewelry, I was using beads. I initially strung up glass beads and Swarovski crystals with base metal spacers but I very quickly graduated up to gemstone beads and wire wrapping. Since natural gemstone beads don’t come in just any pantone color, I realized that combining colors for a pleasing result could be challenging.

What helped me was mixing color “themes” either on tissue paper or a white plate. I pulled some beads off the strands, mixing until I had the right colors, the right proportions of those colors, and the right metal for spacers. (I used to have a LOT of beads). 

I still work this way. As we carry a lot of melee gems, I can lay them out together until I have a combination I like, and I can use the little sticky boxes from Stuller to make gems face right side up. But given that I’ve done this for over a decade, I can offer some shortcuts:

    1. Start with the gem you really want to use. This does not have to be the focal gem, it might be a single accent stone or a few melee. In many of my designs, the center stone is the complement and the side stones the attraction. This makes particular sense when the bigger stones are too expensive.
      Mexican Fire Opal and Ruby Ring
      Mexican Fire Opal and Ruby Ring
      Malaya Garnet and Paraiba Tourmaline Ring
      Malaya Garnet and Paraiba Tourmaline Ring
    2. Once you have your main focus, you work on complementing it. I personally like working tone in tone, meaning ombres or gems of the same variety because they always seem like they belong together. But availability doesn’t always allow for that, so another way to go is contrastive: pinks and greens, purples and blues, peach and teal, pink and orange, yellow and purple. Always keeping in mind which color should be dominant.
Pink Sapphire and Emerald Ring (Camellia Ring)
Our Camellia Ring Featuring Pink Sapphire and Emerald
Malaya Garnet, Ruby and Diamond (Camellia Ring)
Our Camellia Ring Featuring Malaya Garnet, Ruby and Diamond
Malaya garnet and Kornerupine (large Cocktail Ring)
Large Cocktail Ring Featuring Malaya Garnet and Kornerupine


All Sapphire (Kite Style Pendant)
Kite Style Pendant Pendant Featuring Multi-Colored Sapphires


Diamond, Paraiba and Hauyne (Juliette Ring)
Our Juliette Ring Featuring Diamond, Paraiba and Hauyne


Zircon and Red Spinel (Rosette Ring)
Our Rosette Ring Featuring Zircon and Red Spinel
Gatsby Malaya Garnet Kornerupine
Our Gatsby Pendant Featuring Malaya Garnet and Kornerupine


    1. Metal is a color. Here’s a link to the blog I did on metals. Rose gold blends the most with other colors, yellow gold is a totally independent color, white gold cools the temperature but can look like too much metal if the side stone gems are not diamonds.
      zircon mint garnet Camellia
      Our Camellia Pendant Featuring Zircon and Mint Garnet


  1. Don’t forget that gemstones have other properties besides color, and they matter. Gems can be transparent (aquamarine) or satiny (emerald), and it’s often easier to combine just transparent and just satiny stones, unless again you are trying to complement. Gems also range from very brilliant (diamond) to almost not brilliant at all (Paraiba Tourmaline). Combining these will be more contrastive, less complementary.
    Paraiba and Diamond (Cleo Ring)
    Our Cleo Ring, Featuring Paraiba Tourmaline and Diamond
    Paraiba and Hauyne Ring
    Paraiba Tourmaline and Hauyne Ring


  2. Natural gemstones also have hues, bi-color effects, color change, di- and tri-chroism, all of which have to be considered in the overall color scheme. For example, purple-pink sapphires often have a bi-color effect that is due to zoning in the gem. Sphene, kornerupine and unheated tanzanite often exhibit some degree of di or tri-chroism, and some garnet, sapphire and alexandrite exhibit color change. For gems like this, it’s best to complement the colors that are already there, as opposed to trying to introduce an entirely new color.
    Purple Garnet, Mahenge Spinel, Tanzanite, & Cobalt Spinel
    Purple Garnet, Mahenge Spinel, Tanzanite, and Cobalt Spinel


    Purple Garnet and color change garnet (Edwardian ring)
    Our Edwardian Ring Featuring Purple Garnet and Color Change Garnet


    Purple Garnet, Hauyne and Mahenge Spinel (Tudor Pendant)
    Our Tudor Pendant, Featuring Purple Garnet, Hauyne and Mahenge Spinel


    Elizabeth Ring with Sphene
    Elizabeth Ring Featuring Sphene

One final tip. When I first learned how to use a real camera, back in 1982, my dad’s simple advice was this: if you don’t like the way it looks through the camera, don’t take the picture. In other words, trust what you see, not what you want to see. If you don’t like a combo, don’t try to like it, it won’t work. I often used to make pieces where after an initial ever so brilliant idea, my reaction to the actual combination was “meh.” Most of those pieces had to be sold at discount. That’s not a mistake you need to repeat. ☺️

Continue reading

The C that Really Matters: Judging Gemstones by Color

The C that Really Matters: Judging Gemstones by Color

So they tell you that you have to judge the value of a gem by the four C’s: Carat, Clarity, Cut and Color.

Carat refers to the weight of the gem of course.  A larger gem will cost more than a smaller one, not only because of it’s sheer size but also because prices jump according to weight.  This is very obvious when you consider diamonds: one carat diamond costs more per carat than a .95 carat diamond. 

Clarity is about the inclusions in a gem. The more included the gem, the lower its value.  Each gem should be judged vis a vis other gems of its kind, because an emerald need not be as clean as a sapphire to be valuable, whereas a tanzanite should be cleaner than a sapphire (it should be loupe clean, actually).

Cut is important because if the facets are not properly angled – for example – the gem may have window and thus be less pretty. 

Color, however, should be the most important of the four C’s. It is certainly my first C.

Why? Because color is the first thing you see. Consider: someone steps into a dimly lit room wearing a top color Paraiba tourmaline ring. You will see it from several feet away. A neon color Paraiba is an eye turner. After that, you may notice the size, but even a small Paraiba will pack a punch. To know the clarity of the gem or the cutting, however, you have to put it close to your eye, or even loupe it. It’s not therefore what draws you in. You want a Paraiba because of its unique and unmistakeable color. 

And not just Paraiba. Pinkish-red Jedi spinel, cobalt spinel, the German Hauyne, royal blue sapphire, Colombian emerald, all of them are show stoppers because of their color. Even softer colored gems, like a Padparadscha color sapphire, owe their beauty to their color, first and foremost.

An old school gem dealer once imparted the following piece of advice to me: If you don’t like it, don’t buy it. Simple right? Not really. The above mentioned Padparadscha sapphire is a good example. In some of the old stock photos referred to in judging the ideal color, you can see a near perfect Lotus Color mix of pink and orange, exactly right to make it seem pink, peach and orange all at the same time. 

But in real life, even expensive Padparadschas are often too pale, too pink, too orange, too brown. I would counsel against buying those. One has to like the stone, not just think it valuable. Once the current Padparadscha craze has passed, the prices on the not so pretty specimens are going to come down much faster than on the really gorgeous ones. If that happens, one owns a lemon, not a lotus.

When I go on location and am offered new and unusual stones, I have to keep this advice in mind as well. I can’t allow myself to buy a green kornerupine just because it’s a kornerupine. The really neat-looking Kornerpine are not green, they are tealbluegreenpurple. They have a bunch of colors, soft yet extremely eye-catching. Green kornerupines are very pretty but they are not as out of the ordinary pretty as the tealbluegreenpurple.

Alexandrite, like Padparadscha, is also stone that is more expensive than its color suggests it should be. Most available material on the market that has a good color change is muddy looking because it’s the silk in the stone that helps the color change along. Also the good color changers are often darker in daytime lighting. I don’t know how many times I have had a client interested in an alexandrite, only to be disappointed when they actually see it in real life.

On the bright side – literally: the finest specimens of Burma spinel – the Jedi’s – are not actually red.  And they are not actually pink. They are redpink or pinkred, and that means that some online descriptions (and sadly also the photos) can often be misleading. The color is hard to photograph, hard to describe, but it’s the color that makes it a Jedi, and gives it most of its value.

When you get to the greens, the finest specimens of grossular garnet are not tsavorite, and not mint garnets – which is a commercial distinction made for advertising purposes by the way as it’s THE SAME stone. The most beautiful grossular is where the two colors meet, the one where one can’t always decide whether or not it should be a tsav or a mint. Let your eye be the judge, not the description.

I think you get where this is going: trust your eye. Trust it, but also train it, and you’ll be able to judge color as well as the next person. Keep looking and looking and looking. If you are as obsessed as I am, you should not find that difficult.

Look in person (monitors can be deceiving, so can photography). Look In natural but diffused daylight, outdoors or by a window. The closer you are to the equator, or the cleaner your air, the less light you need. In NY for instance, our light is 10% darker or more because of pollution.  And in winter, our afternoon light is very yellow. If you are just starting out with your looking, buy a few melee gems for practice, or just gemstone beads. It’s cheaper, and also fun to play with beads.

When you use indoor light at a vendor’s office or store and are trying to decide if you want to buy the stone, make sure you know what kind of light it is: halogen, LED, fluorescent, incandescent, as well as different light temperatures and dimmable lights. Some gems, i.e. unheated sapphire and spinel, are especially affected by these lighting conditions. For traditional color changers like alexandrite and blue garnet, however, change only shows in incandescent or candle light. But the state of California, for example, no longer allows the sale of incandescent bulbs. So there goes your color change, unless you buy candles.

And in case you didn’t know: you are within your rights to ask if you can see the gem outside. That is a very standard request. You will be accompanied by a sales person who may be handling the gem at all times but outdoor light is how a gem is judged. Any, really all, indoor lighting changes the way a gem looks.

Here are some beautiful examples of amazing color currently available in our shop:


Trillion Cut Sugarloaf Paraiba Tourmaline


Cushion Cut Kornerupine


Oval Paraiba Tourmaline from Brazil


Cushion Cut Burma Jedi Red Spinel


Cushion Cut Cobalt Spinel from Vietnam 
Cushion Cut Cobalt Spinel from Vietnam


Continue reading

The Three C’s of CRD: Color, Color, and Color

The Three C’s of CRD: Color, Color, and Color

What is the one thing, the main thing, that draws people to my shop? I think it’s color.  Any aspect of it really.  I get questions about gem color combinations, about how to work with different gold colors, questions about the color of gems from specific locations as well as gemstone pricing and value based on color.  My best-selling gems and jewels sell because of their colors.

When I look for gems to curate in the shop, I care about cut, treatment origin, rarity, but most of all, I care about color.  Color is my big C, the three other c’s (clarity, cut, carat) are secondary.  Cecile, my middle name, is C for Color (ok, I just made that up)!

It only makes sense, therefore, to talk more about color.  I’ve written many such blogs before, so for those of you who read everything I write, this is in part review.  This blog focuses on metal colors, the next two blogs will discuss the importance of color in selecting gemstones, and how to combine gem colors in jewelry design.

How Metal colors affect design:

Yellow Gold

Yellow gold has a very traditional but also timeless look, and it is a color enhancer for most gemstone combinations.  When designing with it, you should treat it as an additional color, so you need to work it in and think of it as adding yellow tones or warmth to your layout. Yellow gold can be combined with warm and cooler gemstone combos. In higher carats it’s great for working with soft stones. This is one reason why so much emerald jewelry is made in yellow gold.


Rose Gold

Rose gold blends well with most designs and skin tones; it enhances pinks, it contrasts with blues and greens, and all in all provides a softer contrast to color designs than yellow gold.  It’s a go to for me because it runs no interference with my color layouts, but I have heard from clients that it doesn’t work well on yellowish skin. So you should try it first before you splurge. For setting purposes, it’s as hard as white gold.


rose gold earrings with tsavorite and pink tourmaline


rose gold bracelet with rubies


pendant with zircon, color change garnet, purple garnet


White Gold

While slightly contrastive, white gold can wash out softer colors, so it’s best used with very vibrant tones that hold their own. I personally love white gold with neon red, for instance, but also with strong greens like Colombian emerald from Muzo. White gold is a “go to” metal for white diamonds because the diamonds blend with the white metal and make them look bigger. But for this reason, you have to consider that colored stone halos can have a sort of “metal” look when you use halo gems that are too small (you don’t face this problem with white diamonds). I find that with white gold the “metal look” can be stronger than with yellow or rose gold (the same is true for platinum). On the practical side, white gold needs to be rhodium plated on occasion, as rhodium rubs off over time, especially in rings.


white gold pendant with zircon, mint garnet, tsavorite and pink tourmaline


Other gold colors: there’s green gold, peach gold, and a kind of grey gold on the market.  I rarely use any, but here are some pointers. 

Platinum

Platinum mostly works like white gold but it is actually a little bit colder in tone. To some people it looks greyish actually. However, in the current market it has the same price as 18kt gold so you might consider it as it ups the value of your piece at little extra cost – don’t forget that platinum is heavier than white gold (so if you have a metal weight in gold you need to convert it before you calculate the cost).  Secondly, it is very easy for a setter to work with, especially when you are dealing with soft stones like Paraiba tourmaline. Nevertheless it lasts very well.


Other Metals

There are actually several other colors of gold available on the market today.

Green gold is really a cooler tone of yellow gold (sometimes described as olive). It is often cast in 18 kt because it looks too faint in 14.  Green gold tones are in style so you may well have 18k gold jewelry that is officially yellow but has a cooler tone (so it’s closer to green gold than to yellow). If you like the more yellow look, then you might consider using 18 kt Royal gold (my casting service offers this, but only in 18, not in 14).


Peach gold is half way between rose gold and yellow gold. It’s not a loud color, softer than either rose or yellow in fact. You can use it to bring out yellow and peach or orange tones, or use it contrastively.  I made a peach gold ring with a lavender halo and a pad-like orange sapphire that looked great and sold quickly.


14 Kt Peach Gold Spinel and Paraiba Ring
14K Peach Gold Spinel and Paraiba Ring


Cocoa gold, as my casting service calls it, can be used in lieu of black rhodium and it won’t come off. It’s not as dark as black rhodium but rather has a hint of brown or grey depending on the light. I have not experimented with it to be honest, as it doesn’t work with my style. I think it would look great with white diamond or spinel, or with cooler blues. My mind’s eye envisions it set with hauyne and diamond.

A quick note on silver

Silver is a cheap metal, and great to work with for setting, but: (a) if you don’t like the oxidized look, that’s a problem because unless you submerge it in silver cleaner, it will not completely come off, and of course it will reappear. And (b), it IS soft. Silver prongs will break off easily, and a dainty ring can bend. If you have a nice stone to set, just save up for gold! Also, while we can in principle cast in yellow and pink silver, we strongly recommend against it as it oxidizes strongly and then looks quite ugly. 


silver sunflower pendant with kyanite


There’s such a thing as platinum silver too, which is 92.5% silver and 3-6% platinum.  It will oxidize, albeit more slowly, and it is a little heavier. It will generally last better than silver, but not as well as gold.

At CRD, our go to metals are 18 and 14 kt yellow gold, 14 kt white and rose gold, and platinum. On special request, we can design in any other metal listed here, as well as 18K Palladium.


18K Rose Gold Emerald hauyne flower ring


For more information, have a look at the website of our casting service here

Continue reading

From Start to Finish: Fine Jewelry Production in the Diamond District

From Start to Finish: Fine Jewelry Production in the Diamond District

Yet, somehow, this little company manages to work on up to 10 custom orders at the same time (more during the holidays), make another 10-20 unique pieces a month, as well as source and curate unusual gems.  How do we do it?

The answer, for us as well as any and every small shop, is “outsourcing.” 

Continue reading

How we Make Stuff, Continued: Wax Model, CAD Model, or Hand Fabrication?

How we Make Stuff, Continued: Wax Model, CAD Model, or Hand Fabrication?

As I briefly discussed in my previous blog, Cecile Raley Designs primarily designs jewelry using CAD.  This is probably the most cost-effective way to produce a jewelry design, but it’s by no means the only way.  Let's first have a look at the other two ways of making a piece of jewelry: wax model and hand fabrication, to see the advantages and drawbacks of each.

This blog is co-authored with Inken Krause, owner of Enhoerning Jewelry - Most of Inken's own jewelry is hand fabricated from scratch, and she uses hand carved wax for certain custom orders, especially for antique inspired reproduction pieces.

Wax Modeling: this is carving the piece in wax first, then casting it in the desired metal.  Almost any piece of jewelry can be produced this way. Carving elaborate wax models requires a lot of experience and a steady hand.  Few tools are required: manual carving tools or a flex shaft, a source of heat like a wax pen, and of course, carving wax.  The most expensive part of wax modeling is the labor, it can take hours to days to make a piece. If changes are needed, the carver may well have to start from scratch.  A wax carver also needs to understand the geometry of the design, starting from shrinkage in casting, to what gems are set and how.  That way, the carver can carve out prongs or a channel, or just leave the correctly calculated space on the metal for the setter.  Many wax carvers are learned jewelers and carving is only one of their skills, and their jewelry experience will inform how they proceed.

The main advantages of wax carving are being able to carve almost anything, being able to create designs of varying complexity, and being able to produce very organic designs.  The disadvantage is the cost of labor.  A wax carving can take a couple of hours up to a couple of days!

Wax Carved Ring with Wire Open Work And Piercing by Enhoerning Jewelry"Wire-based jewelry styles styles can be emulated in CAD or with hand-carved wax, but they tend to come out less clean, and sometimes the "wires" will be a little squarish and not perfectly round." Inken Krause

Wax Carved Ring Design
Hand-Fabricated Ring (piercing work and a-jour), by Enhoerning Jewelry


Hand Fabrication: this process refers to the actual metalsmithing of a piece, e.g. cutting and sawing sheet metal, stretching wire or rolling out metal if needed, and then soldering everything together.  No casting will be required, except perhaps if one wants to make a mold of the finished piece to recast for later usage or to make more pieces of that same exact design.

An advantage of hand fabrication is achieving a certain level of detail that you can’t get with CAD.  One can right away work in mixed metals by just soldering together any metals one likes. Individual parts can be cleaned and fine-tuned before they are assembled, and they can be remade as well if there’s a mistake.  Metalsmithing lends itself to making high-end and intricate pieces, though not to any kind of organic design as the basic shapes are flat metals and various shapes of wire (round, flat half-round).  But hand fabrication is very time-consuming and therein also lies the drawback; it can be very expensive.  A ring with many parts can take a week in labor instead of a few hours or a day or two with wax carving. Finally, the “bench work” as we call it in the trade, requires enormous amounts of skill and that too costs money.  But the finished look is often stunning in its detail and well worth the price for a fine quality piece for an extraordinary gem.

Hand Fabricated Sapphire Ring with Wire Work Gallery by Enhoerning Jewelry
"Hand fabricated jewelry is often based on hand-drawn wire; the use of wire allows for the creation of intricate baskets and decorative elements which will look extremely clean and feel very smooth to the touch. Hand fabricated (forged) jewelry offers superior durability because there is no risk of porosity from air bubbles trapped in the metal, something that can happen with cast pieces." Inken Krause


CAD Modeling: making the model on the computer with the help of a CAD program like Rhino.  CAD modeling was originally developed for mathematical design, but as jewelry design involves just that (i.e. a lot of geometry), adapting these programs for jewelry design was a logical step. CAD programs are difficult to use at first (and expensive to buy), and just like with the two other methods of fabrication mentioned above, it also requires a good understanding of how jewelry is made.  Shrinkage in casting has to be calculated; prong placement, basket, and gallery designs need to be such that they don’t break in casting, they allow for wear and tear, they allow for the setter to have enough metal to work with (i.e. prong thickness and length, depth of basket), and that they can be properly cleaned after casting, to remove the gridlines of the printer – an issue that doesn’t arise in hand fabrication, as one can clean and polish off at any step during assembly.

Fully Rendered CAD File for a Three Stone Ring by CRD


An advantage of CAD modeling is certainly the price because an extremely simple model (say a wedding band) can be done in just minutes, up to a couple of hours for something complicated, and maybe a day for an extremely elaborate and organic design.  Changes can be simple and don’t involve and waste of metal or wax.  Changes require deleting a lot of steps or just a few, just like deleting a paragraph in a letter or scrapping the entire thing.  Also, a jeweler can provide a file for a model meant for a different stone size and have the CAD designer make a model based on the original specs, thereby creating a new model that is exactly to specs.  (When you look at the Stuller catalog and click on the different gem sizes and shapes to see an image, you are actually calling up an image of a new CAD file made for that gem size and shape in the same design).

Modification of Lily Design for Six Sidestones by CRD


Also, a CAD model can be rendered for viewing, meaning a “rendering” software is used to give the CAD model a finished look.  Rendering software comes with colors to represent gems and metal, metal finishes (like brushed or polished), and other tools that provide the client a sneak peek of the finished piece, allowing for easier adjustments and modifications based on the rendering.  

A disadvantage of CAD modeling is that because the process is mathematical/geometrical, i.e. by working out the geometry of a quarter of a ring top and then replicating it for the other three quarters, organic designs are much more difficult to achieve.  As you may remember from your school days, the geometry of a cube is much simpler than that of a donut (which is actually very advanced geometry).  For organic designs, therefore, a wax carving is the better way to go.  Additionally, CAD models often have a less intricate and detailed look than wax carving or hand fabrication. 

Layout for CAD Ring by CRD
CAD Rendering of the Above


This lack of intricacy can be partly remedied by hand engraving the piece as opposed to adding a pattern to the CAD, and by hand setting it as opposed to adding beads and millgrain to the CAD.  This also allows for more variability in the finished piece (i.e. you can set any number of gems into a band or on a shank, as opposed to having to fill the prongs that were already added in the CAD). But as you may have guessed, this increases the price again, as it adds the labor in at another step of the process.

Is there, then, a BEST way to make a piece of jewelry?  In my view, no.  Cecile Raley Designs is generally very happy with using CAD, but we have also done wax modeling and hand fabrication.  One can also mix and match, i.e. cast ring shanks but build the prongs, etc.  Making a pendant always involves some simple metalsmithing, as does a post earring, because jump rings and bails or posts have to be soldered on manually after casting.  So on the whole, any design house should have all three methods at its disposal, even if it has a preferred way of manufacture.

Back of a Hand Fabricated Ruby Necklace by Enhoerning Jewelry
While hand fabrication allows for the creation of finely-detailed pieces, there are limitations when it comes to textures and engraving. Chased or engraved elements are usually not applied by a goldsmith, but require the highly specialized skills of a hand engraver." Inken Krause

As you can see, using CAD, the same design can be easily modified by adding or subtracting elements:
New Set of Contour Rings Currently in Production (Waiting for Engraved Versions by Alex P, our Hand Engraving Artist)
    Continue reading

    Colored Gems are not Diamonds: How We Make Stuff, Differently

    It happens to us at CRD all the time: a client with a low budget asks for raw castings so that they can set or glue their own stone.  And we tell them: you can’t set anything that way, there will be no beads to push over, there’s no millgrain, sometimes no hole for the gem.  The casting will just look like a piece of metal with a shape.  You have to cut the seat, file the claws. 

    Emerald and Diamond Ring with Claw Prongs and Diamond Cut Down Pave


    Clients also get castings to have their own gems set locally.  Before I do that, I usually ask if their jeweler has experience in working with colored stones. I have to make sure because it’s a specialized skill and pave work requires a $3000 microscope.  I’m happy to just sell gems but I also I want to protect my client.  Many colored gems scratch more easily, and one has to apply less force when setting them.  Colored stones cannot touch in pave setting because they can crush each other.

    Hand Pave Set Benitoite Ring


    Our CAD Designs contain a lot fewer details than standard CADs because the setting is all done “by hand”.  We also make designs with super-long prongs so that colored gems with a deep “belly” can fit – of course long prongs are wasted metal if you set diamonds, which is one of the main reasons most commercial settings do not have them (they are also manufactured by the thousands, and ours are not).  With longer prongs you can also set a stone that is a touch larger than the official “fit”.  The stone will now sit a little higher, that’s all, or the prongs are opened up more, or both.  You can also set a stone that is smaller.  In that case we millgrain the edge of the halo so it looks intentional.  The millgrain, therefore, is also not in the CAD and therefore has to be done by hand.  

    Ring Setting with Super Long Claws
    Lily Ring Casting, Unfinished Example
    Lily Ring, Finished Example 1
    Lily Ring, Finished Example 2


    Colored gems have characteristics that challenge both the jeweler and setter, and commercial jewelry techniques have to be adapted: they often vary more in size so the holes drilled cannot be as uniform – and they vary in color too, but that’s my job to work on when separating out parcels.  Colored stones are deeper than diamonds and can poke through the back of a wedding band so we had to design our own, which are deeper.  They can push through the side of a bezel, so again, we had to design our own stacking rings and taper the bezel in a more rounded way (the rings also interlock very well because we designed them that way).  Colored gems are soft, which makes it difficult to set them with corner vee prongs, or in princess cut bezels if the bezel walls are too thick, or in hard metals like 18 kt white gold.  The tools for holding them have to be adjusted, or even made.  Ultrasonic has to be avoided at times. 


    Commercial Castings with Beads


    For instance, diamonds for eternity necklaces are set by soldering the settings to a penny and then setting the diamonds, then unsoldering it. But colored gems cannot take that heat so the setter has to find a way to hold a minuscule bezel somehow and still exert enough force to push metal over the stone. 

    Commercial Setting with Ball Prongs, Not Set By Us
    Commercial Casting with Pre-Set Beads and Millgrain in the CAD (Not Set By Us) 


    I was always more fascinated by gems than by jewelry, and so I start with the gem, not the design:  What can I make with this shape or color, and what kind of setting will this gem need me to provide?  As my little company got bigger, we made more and more CAD settings, because we realized we couldn’t make our colored jewelry designs the same way as diamond jewelry was made.

    But its not just the gems that make our jewelry different.  Its also the fact that we love a hand made 1920’s look which you cannot get in CAD because castings are generally more chunky and less detailed than hand fabrication; but at the same time we love the versatility and price advantage that a CAD design offers.  While at CRD we can provide both wax modeling and fully hand fabricated jewelry, both are pricey and rarely are they needed.  There are two other less expensive ways of setting the jewelry apart and capturing the feel of timelessness and hand fabrication:

    • Hand Engraving as opposed to engraving that is built into the CAD:  Alex P., our engraver (and that of Buccellati, but that’s ok), gets the silver model, pre-polished, and I tell him “some here, some there, not so much here, and make it Art Deco-ish or Art Nouveau-ish and you know what you think looks good.” If Alex wasn’t Alex, this lack of “vision” on my part would perhaps leave the engraver without much guidance.  But Alex knows better because he’s done this since he was 14.  And I know he knows!  So why mess things up?!  We offer many of our pieces engraved and non-engraved.  An additional plus of this is that we can make a slightly bigger looking piece that still doesn’t require a lot of extra gems.
    Hand Engraved Ring by Alex P.
    • Hand setting as opposed to putting beads and millgrain into the CAD where the setter just pushes prongs and/or beads.  Pierre B. and Ethan S. do all that work themselves.  They clip down the prongs to the needed size, they can split bigger prongs in half, they file them into balls or claws, small or large, roundish or pointy as you wish.  They drill the holes where the gems go (on occasion we do guide holes for proper spacing of the drill).  They do that based on the size of the gems and whether I throw them a curveball by asking them to set a pear shape into a kite, or an oval, or some such time-consuming thing.  This allows for more size and also some shape variation in one and the same CAD design.  Then, the setters can make a bright cut, cut out beads or scoops or vee’s depending on how best to hold the stone but also improve the overall look.  They fill gaps that look too metal-y with a second row of millgrain, or some extra beads.  They millgrain the inner halo, they lengthen the engraving or invent something if they think it looks good.  Sometimes they also reinvent my color arrangements.  Mostly that’s by accident but if I don’t give specific instructions or say, do what you do best, they get creative.  All my setters tell me they like the work because it’s not like other work but they don’t like the time it takes to do it. 
    Hand Cut Pave
    Layout of Gem Placement before Pave Setting this Ring
    Double Millgrain Penelope Earrings, Hand Set By CRD


    That, of course is one of the upshots here: the most expensive part of our manufacture is setting, sometimes that costs more than the gold and gems. For silver jewelry, I think the added setting cost – which can be 2.5x that of preset castings, even in NY, is not justified for the buyer and so I counsel against it.  I prefer to sell things where there is a good balance between metal and labor, and of course, some rarity to the gems, which are, as you all know, our main passion.

    Hand Pave With Oval Gems, Very Difficult Task  
    One of my Favorite Custom Pieces, Arrow Pendant for an Archer


    Continue reading

    NEW NEW NEW: Rings, Pendants, & Earrings for Alternate Stone Shapes

    NEW NEW NEW: Rings, Pendants, & Earrings for Alternate Stone Shapes

    With Tucson around the corner, I've been thinking long and hard about what new items I could make that would offer up some options for alternate stone shapes.  My main focus this time was the oval, or rather, the roval. In particular, designs that allow for more 3x2 and 4x3 options. There are so many 4x3 ovals on the market and they often cost less, too.  So I worked on a new Lily using those, and Elizabeth shapes for earrings.

    OVAL LILY: These take a 4mm center stone, 4 4x3mm ovals and 2mm (or smaller) gems on the outside.  The width is 17mm, so it's a nice and substantial size.

    Pricing is $680 for the pendant and $760 for the ring in 14kt (note these are new gold prices as gold has gone up a few hundred dollars in the past few months).

    14k gold pendant with sapphires and rubies14k gold ring with tourmaline sapphire and mint garnet

    ELIZABETH EARRINGS: These earrings can be made into studs or danglies, and the components could also be used in a bracelet or as part of a necklace.  They are made for 4x3 and 3x2mm gems.  Prices are $420 for the larger and $390 for the smaller earrings. 

    hauyne rose gold earrings
    7 x 4.5mm with hauyne


    rose gold emerald earrings
    8 x 5.5mm with emeralds


    HEXAGON FOR OVALS: While we were at it, we also made hexagons for rovals (4x3mm and 3x2mm). The smaller hexagons are priced at $370 in 14Kt gold and the larger ones are $400.

    hexagon 14k gold earrings with spinel

    14k gold hexagon earrings with spinel

    STAR FLOWER PENDANT WITH 8 PETALS: We made this model for 3x2mm gems only, because I wanted to feature the hauyne I have but we can also get Burma spinel and hopefully a few other sizes in Tucson.  The center stone is 4mm but I can go up to 4.5mm.  I have a ring version of this as well, but it isn't finished yet. These are priced at $480 for the pendant and $580 for the ring (coming soon!) in 14Kt gold.

    rose gold flower pendant with hauyne and rhodochrosite

    STACKING RINGS: We came out with six new models, five of which are in the photos here. All are priced at $220, which will be our new price for 14 Kt gold stacking rings.  They are made for 6x4 pears and ovals, as well as 3x2 ovals (east west and north south).

    gold stacking rings with gemstones

    gold stacking rings with gemstones

    gold stacking rings with gemstones

    NEW DESIGNS IN PROGRESS: Another underappreciated stone shape for us has been the trillion.  We made a scalloped design for a 6mm center and 15 x 1.5mm round sidestones, pendant and ring.  The pendant will cost $650 and the ring costs $710 in 14Kt gold. The pendant just came out, the ring will be available after Tucson.

    And we also made a design for a 7mm stone which is currently with Alex for engraving of the sides. You'll have to imagine the finished product, but here's how it looks in the CAD. We made the prongs super long so that we can also set a slightly larger than 7mm gem, which we'd open the prongs up a little to accommodate.  A 7mm or a hair smaller gem will sit as shown in the image, and the prongs will be cut down to tiny claws as in all our designs.  The sidestones are 2x2.5rds, 2x 1.6rds and 2x1.5rds or 1x 2.5mm.

    Finally, we have a design coming for a 6mm cushion, an adaptation of last year's prize winner Josephine.  The sidestones for this will be 4x 1.7mm round & 12x 1.3ish mm round.  This model is currently in printing, but we will have a finished item later in February to show you.  


    Continue reading
    • Page 1 of 4